看到这个控件,这到底是什么呢?其实现在主流的APP中几乎都选用了这个控件来作为模块划分的依据,就像QQ,QQ空间,微信,微博之类的APP,下面都有一个选项卡之类的控件,这就是Tabbar。tabbar就跟UINavigationController一样都是容器类,来看看效果:

这就是Tabbar的效果了,来看看是怎样实现的
    AViewController *a = [[AViewController alloc] init];
    //    设置tabbar的元素
    UITabBarItem *itemA = [[UITabBarItem alloc] initWithTabBarSystemItem:UITabBarSystemItemHistory tag:1];
    a.tabBarItem = itemA;


    BViewController *b = [[BViewController alloc] init];
    UITabBarItem *itemB = [[UITabBarItem alloc] initWithTabBarSystemItem:UITabBarSystemItemBookmarks tag:2];
    b.tabBarItem = itemB;


    CViewController *c = [[CViewController alloc] init];
    UITabBarItem *itemC = [[UITabBarItem alloc] initWithTabBarSystemItem:UITabBarSystemItemSearch tag:3];
    c.tabBarItem = itemC;

    DViewController *d = [[DViewController alloc] init];
    UITabBarItem *itemD = [[UITabBarItem alloc] initWithTabBarSystemItem:UITabBarSystemItemMostRecent tag:4];
    d.tabBarItem = itemD;

    DViewController *d1 = [[DViewController alloc] init];

    UINavigationController *nav = [[UINavigationController alloc] initWithRootViewController:d1];

    UITabBarItem *itemD1 = [[UITabBarItem alloc] initWithTabBarSystemItem:UITabBarSystemItemFavorites tag:5];
    nav.tabBarItem = itemD1;

    //    容器类
    UITabBarController *tabBar = [[UITabBarController alloc] init];

    //    设置所有的视图控制器
    tabBar.viewControllers = @[a,b,c,d,nav];

    //    设置选中的索引值  当前显示的viewcontroller
    //    默认选择第0个视图控制器
    tabBar.selectedIndex = 2;

    self.window.rootViewController = tabBar;
以上是使用系统自己的tabbar,使用起来还是很简单的,下面我们说一下真正常用的tarbar,我们看到的APP它们的tabbar都是不一样的,那肯定不是系统的啊,就必须需要我们自己定义了,下面展示一个自定义的tabbar。
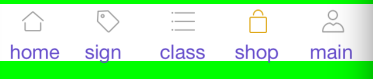
这就是效果,其实实现还是很简单的,来看代码:
注意:这个自定义的tabbar肯定是要继承系统的tarbar的!
@interface MyTabBarController (){
    UIImageView *_tabBarBackgroundImageView;
    int maxBtnTag;
}
- (void)showTabBar;

- (void)hiddenTabBar;
@end

@implementation MyTabBarController

- (void)viewDidLoad {
    [super viewDidLoad];
    AViewController *homeVC = [[AViewController alloc] init];
    UINavigationController *homeNav = [[UINavigationController alloc] initWithRootViewController:homeVC];


    BViewController *signVC = [[BViewController alloc] init];
    UINavigationController *signNav = [[UINavigationController alloc] initWithRootViewController:signVC];


    CViewController *classVC = [[CViewController alloc] init];
    UINavigationController *classNav = [[UINavigationController alloc] initWithRootViewController:classVC];

    DViewController *shopVC = [[DViewController alloc] init];
    UINavigationController *shopNav = [[UINavigationController alloc] initWithRootViewController:shopVC];

    AViewController *mineVC = [[AViewController alloc] init];
    UINavigationController *mineNav = [[UINavigationController alloc] initWithRootViewController:mineVC];


    //    调用这个viewControllers
    NSArray *navArray = @[homeNav,signNav,classNav,shopNav,mineNav];
    [self setViewControllers:navArray animated:YES];

    //    self.viewControllers = navArray


    //    添加自定义按钮
    [self myTabBar];

}

- (void)myTabBar
{
    //    创建背景图片
    _tabBarBackgroundImageView = [[UIImageView alloc] initWithFrame:CGRectMake(0, 480-49, 320, 49)];

    //    指定自定义图片
    _tabBarBackgroundImageView.image = [UIImage imageNamed:@"tabBarBackground"];
    _tabBarBackgroundImageView.userInteractionEnabled = YES;
    [self.view addSubview:_tabBarBackgroundImageView];

    NSArray *arr = @[@"home",@"sign",@"class",@"shop",@"main"];

    int intervalX = 320/5;
    for (int i = 0; i < 5; i++) {
        UIImageView *titleImage = [[UIImageView alloc] init];


        UILabel *lab = [[UILabel alloc] initWithFrame:CGRectMake(10+intervalX*i, 26, 64, 30)];
        lab.text = [arr objectAtIndex:i];
        lab.textColor = [UIColor colorWithRed:0.4 green:0.3 blue:0.8 alpha:1];
        [_tabBarBackgroundImageView addSubview:lab];


        //        设置tabbar上图标的位置
        titleImage.frame = CGRectMake(20+intervalX*i, 5, 20, 20);
        titleImage.tag = i+11;

        if (i==0) {
            [titleImage setImage:[UIImage imageNamed:[NSString stringWithFormat:@"%d",i+1]]];
        }
        else
        {
            [titleImage setImage:[UIImage imageNamed:[NSString stringWithFormat:@"unH%d",i+1]]];

        }


        [_tabBarBackgroundImageView addSubview:titleImage];


    }

    //    创建按钮
    //    int intervalX = 320/5;
    //    for (int i = 0; i < 5; i++) {
    //        UIButton *btn = [UIButton buttonWithType:UIButtonTypeCustom];
    //        btn.frame = CGRectMake(20+intervalX*i, 5, 20, 20);
    //        btn.tag = i+1;
    //
    //        if (i==0) {
    //            [btn setImage:[UIImage imageNamed:[NSString stringWithFormat:@"%d",i+1]] forState:UIControlStateNormal];
    //        }
    //        else
    //        {
    //            [btn setImage:[UIImage imageNamed:[NSString stringWithFormat:@"unH%d",i+1]] forState:UIControlStateNormal];
    //
    //        }
    //
    //        [btn addTarget:self action:@selector(btnClick:) forControlEvents:UIControlEventTouchUpInside];
    //        [_tabBarBackgroundImageView addSubview:btn];
    //
    //
    //    }

    for (int i = 0; i < 5; i++) {
        UIButton *btn = [UIButton buttonWithType:UIButtonTypeCustom];
        btn.frame = CGRectMake(intervalX*i, 0, intervalX , 49);
        btn.tag = i+1;

        [btn addTarget:self action:@selector(btnClick:) forControlEvents:UIControlEventTouchUpInside];
        [_tabBarBackgroundImageView addSubview:btn];


    }


}


static NSInteger selectBtn = 1;

- (void)btnClick:(UIButton *)button
{
    //    视图的切换
    self.selectedIndex = button.tag-1;

    //   如果选中和当前的相同的话返回
    if (selectBtn == button.tag) {
        return;
    }

    UIImageView *btn1 = (UIImageView *)[self.view viewWithTag:button.tag + 10];
    [btn1 setImage:[UIImage imageNamed:[NSString stringWithFormat:@"%ld",button.tag]] ];

    //    找到上一个按钮 并且让按钮的高亮状态变成非高亮
    UIImageView *btn = (UIImageView *)[self.view viewWithTag:selectBtn + 10];
    [btn setImage:[UIImage imageNamed:[NSString stringWithFormat:@"unH%ld",(long)selectBtn]] ];
    //    记录上一个按钮的值
    selectBtn = button.tag;


    //    self.selectedIndex = button.tag-1;
    //
    ////   如果选中和当前的相同的话返回
    //    if (selectBtn == button.tag) {
    //        return;
    //    }
    //    [button setImage:[UIImage imageNamed:[NSString stringWithFormat:@"%d",button.tag]] forState:UIControlStateNormal];
    //
    ////    找到上一个按钮 并且让按钮的高亮状态变成非高亮
    //    UIButton *btn = (UIButton *)[self.view viewWithTag:selectBtn];
    //    [btn setImage:[UIImage imageNamed:[NSString stringWithFormat:@"unH%d",selectBtn]] forState:UIControlStateNormal];
    ////    记录上一个按钮的值
    //    selectBtn = button.tag;


}

//
- (void)showTabBar{
    _tabBarBackgroundImageView.hidden = NO;

}

- (void)hiddenTabBar{
    _tabBarBackgroundImageView.hidden = YES;
}
当然了,以上只是一个很简单的自定义 tabbar,如果真正想用到开发中的自定义tabbar 可以参考代码请查看 这里