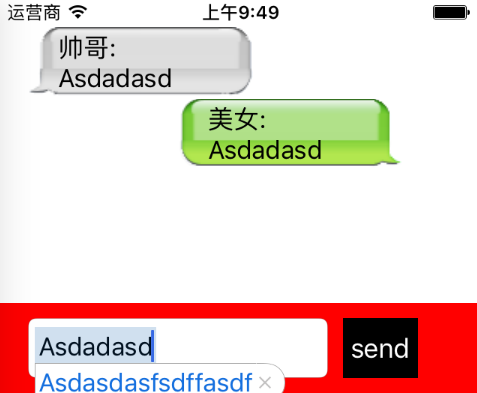
什么是气泡聊天呢?就像QQ和微信的聊天界面一样,发一句话就出现在页面上,并且还会出现一个气泡的背景,这就是气泡聊天。
在实现气泡聊天之前我们先看一下关于图片拉伸的问题,因为我们的图片像素不够高,但是我们发送的文字并不是固定长度的,所以我们要根据文字的大小来拉伸图片,还不能让图片放大的时候失真,这里我们介绍一下使用的方法:边帽法拉伸图片。
    UIImageView *imageView = [[UIImageView alloc] initWithFrame:CGRectMake(0, 0, 150, height)];
    UIImage *image = _whoSay ? [UIImage imageNamed:@"bubbleSelf"]:[UIImage imageNamed:@"bubble"];
    //    边帽法放大图片,而且不会让图片失真
    //    以一个点进行拉伸 往左往上拉伸
    imageView.image = [image stretchableImageWithLeftCapWidth:20 topCapHeight:10];
下面来看一下我们这里是怎么简单实现气泡聊天的,由于是例子,我们就左右交替出现聊天的气泡
/*创建UI*/
- (void)createUI{
    _tableView = [[UITableView alloc] initWithFrame:CGRectMake(0, 20, 320, 420) style:UITableViewStylePlain];
    _tableView.delegate = self;
    _tableView.dataSource = self;
    _tableView.separatorColor = [UIColor clearColor];
    //    tableView.separatorStyle
    [_tableView registerClass:[UITableViewCell class] forCellReuseIdentifier:@"cell"];
    [self.view addSubview:_tableView];


    _view = [[UIView alloc] initWithFrame:CGRectMake(0, 420, 320, 60)];
    NSLog(@"view == %@",_view);
    _view.backgroundColor = [UIColor redColor];
    [self.view addSubview:_view];

    _contentTextField = [[UITextField alloc] initWithFrame:CGRectMake(20, 10, 200, 40)];
    _contentTextField.delegate = self;
    _contentTextField.borderStyle = UITextBorderStyleRoundedRect;
    [_view addSubview:_contentTextField];

    UIButton *sendBtn = [UIButton buttonWithType:UIButtonTypeCustom];
    sendBtn.frame = CGRectMake(230, 10, 50, 40);
    [sendBtn addTarget:self action:@selector(sendMessages:) forControlEvents:UIControlEventTouchUpInside];
    sendBtn.backgroundColor = [UIColor blackColor];
    [sendBtn setTitle:@"send" forState:UIControlStateNormal];
    [_view addSubview:sendBtn];


    _contentArray = [[NSMutableArray alloc] initWithCapacity:0];
}


//发送消息
- (void)sendMessages:(UIButton *)btn{
    //    1.获取字符串的高度

    //    获取输入框内的内容
    NSString *string = _contentTextField.text;

    NSString *whoSayer = _whoSay ? @"美女:":@"帅哥:";


    //    把谁说和说的内容拼接到一起
    //    \n  换行
    NSString *contentString = [NSString stringWithFormat:@"%@ \n%@",whoSayer,string];

    //   2.0 - 7.0可以使用
    //    [contentString sizeWithFont:[UIFont systemFontOfSize:20] forWidth:120 lineBreakMode:NSLineBreakByWordWrapping];
    //    新方法
    float height = [contentString boundingRectWithSize:CGSizeMake(120, MAXFLOAT) options:NSStringDrawingUsesLineFragmentOrigin attributes:@{NSFontAttributeName: [UIFont systemFontOfSize:20]} context:nil].size.height;

    NSLog(@"----- ==== %f",height);


    //    存放view的数组

    int x = _whoSay?120:20;

    UIView *view = [[UIView alloc] initWithFrame:CGRectMake(x, 0, 150, height)];
    view.tag = 100;
    //    view.backgroundColor = [UIColor redColor];


    //    往view上添加 imageview的气泡  还有显示内容的lab

    UIImageView *imageView = [[UIImageView alloc] initWithFrame:CGRectMake(0, 0, 150, height)];

    UIImage *image = _whoSay ? [UIImage imageNamed:@"bubbleSelf"]:[UIImage imageNamed:@"bubble"];

    //    边帽法放大图片,而且不会让图片失真
    //    以一个点进行拉伸 往左往上拉伸
    imageView.image = [image stretchableImageWithLeftCapWidth:20 topCapHeight:10];
    [view addSubview:imageView];


    UILabel *lab = [[UILabel alloc] initWithFrame:CGRectMake(20, 0, 120, height)];
    lab.numberOfLines = 0;
    lab.text = contentString;

    [imageView addSubview:lab];


    [_contentArray addObject:view];

    _whoSay = !_whoSay;


    //    刷新表

    [_tableView reloadData];

    NSIndexPath *indexPath = [NSIndexPath indexPathForRow:_contentArray.count-1 inSection:0];

    [_tableView scrollToRowAtIndexPath:indexPath atScrollPosition:UITableViewScrollPositionTop animated:YES];

}


#pragma mark -
#pragma textField的代理方法

//让输入框上移
- (void)textFieldDidBeginEditing:(UITextField *)textField{
    //    获取对象
    UIView *view = textField.superview;
    //
    [UIView animateWithDuration:0.23 animations:^{
        view.frame = CGRectMake(0, 480-216-60, 320, 60);
        _tableView.frame = CGRectMake(0, 20, 320, 460-216-60);
    }];

}


#pragma mark -
#pragma 表的代理方法

- (CGFloat)tableView:(UITableView *)tableView heightForRowAtIndexPath:(NSIndexPath *)indexPath{
    UIView *view =[_contentArray objectAtIndex:indexPath.row];
    return view.frame.size.height;
}

- (NSInteger)tableView:(UITableView *)tableView numberOfRowsInSection:(NSInteger)section{
    return _contentArray.count;
}

- (UITableViewCell *)tableView:(UITableView *)tableView cellForRowAtIndexPath:(NSIndexPath *)indexPath{
    UITableViewCell *cell  =[tableView dequeueReusableCellWithIdentifier:@"cell" forIndexPath:indexPath];

    //    在cell 上找tag值为100的view
    UIView *view = [cell viewWithTag:100];
    [view removeFromSuperview];

    //    把获取的view 添加到cell上
    [cell addSubview:[_contentArray objectAtIndex:indexPath.row]];


    return cell;
}

- (void)tableView:(UITableView *)tableView didSelectRowAtIndexPath:(NSIndexPath *)indexPath{
    [self.view endEditing:YES];

    [UIView animateWithDuration:0.23 animations:^{
        _view.frame = CGRectMake(0, 420, 320, 60);
    }];
}
来看一下最终的效果